1. Stereo Widening - Push the “balls” apart for extreme wideness which is effective for cinematic-type underscores with instruments that are L/R panned, spacial synths or sound design. This type of setting may reduce “energy” in rock or pop tracks that have information dead center such as vocals, bass and kick drum. In those instances, the basic stereo enhancement will still give you more deep stereo immersion but keep the center focus intact. Experiment and see what works best - you have control.
2. Headroom - for RMPro to work its magic give it some Headroom - reduce the volume of your mix. Don’t worry you’ll get plenty of power back once you engage the RMPro. The RMPro will give you the best mastering product if you reduce the volume of your overall mix by -3 to -6db. A track that is dense will likely require more reduction than a quieter one. Another way to achieve this is EQ reduction. One of the biggest problems in any mix scenario is the “ mud” that occurs in the middle of your mix after everything is combined, all of the frequencies get harsh. Many DAW’s like Logic Pro X have on-board mastering EQ settings. Pop, Rock, Hip Hop, etc. and they can be a life saver. Pop one of those in the stereo output channel along with the RMPro. They typically reduce volume in that same -3 to -6db range. So now you’ve achieve two key Headroom advantages - cleaned up some of the “mud” and reduced volume to create Headroom. Click the RMPro and you’re back in business.
3. Metering - the absolute best way to ensure the correct output level of your mix, both before and after engaging the RMPro, is to use your DAW’s on-board metering (or a third party one). The meters on the RMPro are general reference, but if you really want to accurately know how loud or soft you are, call up either a Level Meter, or a Loudness Meter which will give you a LUFS reading. The latter is the standard for sending tracks to streaming platforms. If you send a track that is too loud for their technical specs, they will bring it down for you…….and not in a good way.
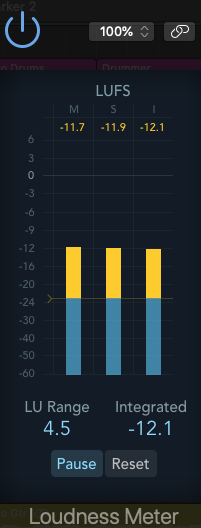
4. Loudness - the trick is to sound loud, without being loud. The RMPro allows you to get maximum intensity from your mix while complying with industry standards. If you provide a killer mix at the appropriate level, it will sound better than loud ones that have been artificially reduced. So, trust your Levels and the PM Pro will give you the edge. Here’s an example of a Loudness Meter. It is indispensable if you are creating content for YouTube, Spotify, Soundcloud, etc. The Loudness target for streaming platforms is between -12 & -15 LUFS. The Loudness Meter pictured has three columns. The one farthest to the right is your guide. It is the Integrated (I) reading, which is essentially an averaging of the other two columns - Momentary & Short Term. It’s easy to adjust for Integrated as it is fairly static. Keep your mixes in the -12/-15 zone and the RM Pro will assure that your track will sound amazing on those platforms. (Note- Traditional broadcast TV has a much lower standard at around -23)
5. Profiles - The mastering Profiles included with the RMPro provide some alternative sonic choices based on your personal taste. Many times, the content will dictate which Profile sounds best. Some have more subtleties and others, more horsepower. There’s no right or wrong, pick which works best for you. We’ll be adding others along the way to give you even more options. The goal with all of the Profiles is to ensure that whatever you produce, from EDM to Audiobooks, is ready for prime time.